
Finite State Machines are invaluable design patterns for video games. Knowing this, I was quite surprised at the lack of resources specifically focused on creating state machines with blueprints in Unreal. Most information that you’ll find online will relate to animation management, but state machines have much more applications than that! This tutorial explores breaking things down into states, some essential features, and blueprint implementation methods used in my own project.
Benefits of state machines
While the set up is more work than using branches or switching on enums, you’ll find that there are many long-term rewards to using one:
- Reduced bugs, cleaner code, and improved understandability.
- Greater expandability compared to long chains of if statements.
- Facilitates teamwork by allowing different roles to handle specific code segments.
- Synergy with animation management as each state can control the corresponding animation state.
- Easier debugging by isolating problem states for focused code examination.
- Encourages code to maintain its scope and purpose.
Breaking down features into a state machine
Begin by identifying the different states your object will have. For characters, states usually align with animations, player control changes or AI goal changes. However, in certain cases, such as game state changes, determining states may be less straightforward: do you make a separate state for an options screen and main menu screen or have them contained in one? The answer for questions like that really relies on your own project needs.
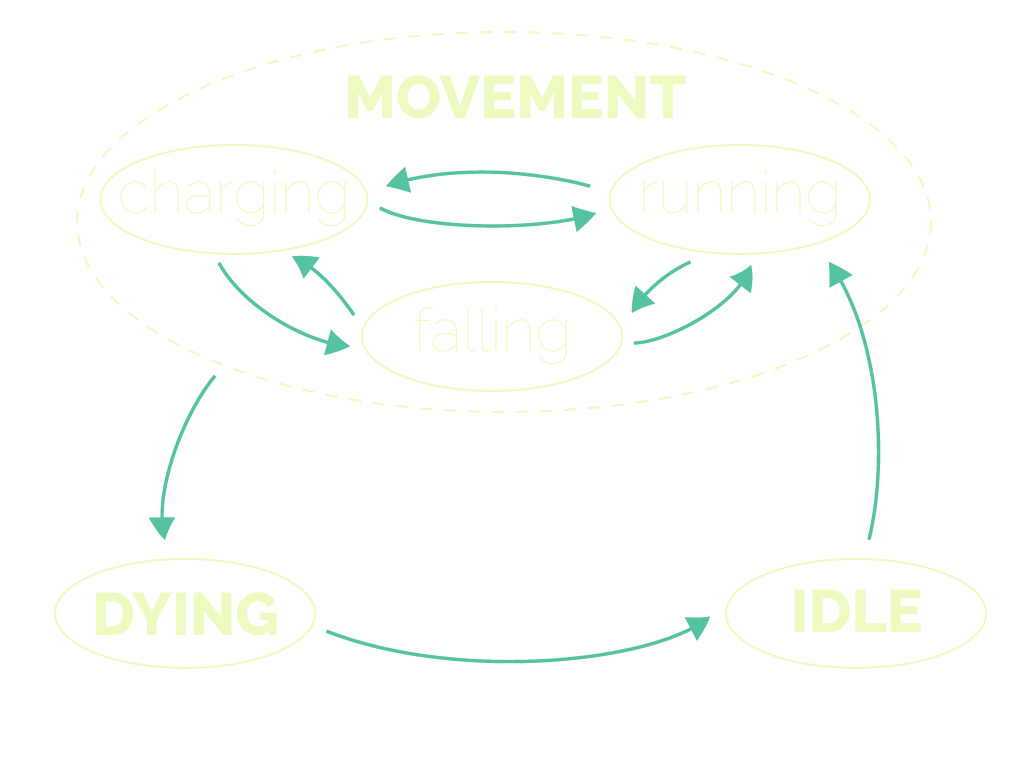
Defining state boundaries is crucial, as states can be as specific or comprehensive as desired. Flow charts are helpful for visualizing state relationships, the above chart illustrates the states for my Ram character, and there are a few things that it shows to keep in mind while making this:
- There are five states, with three related to movement.
- Charging, running, and falling share similar movement features, suggesting the creation of a movement class to manage unified functions.
- Knowing what states can transition into other states sets up expectations for coding by knowing what info needs to pass on to new states.
Alternatively, a table can be used to list state features, where you note similarities and differences to help define the necessary states:
| Charge State | Running State | Dying State | Idle State |
|---|---|---|---|
| Can bash blocks | Can’t bash blocks | Can’t bash blocks | Can’t blocks blocks |
| Can fall | Can fall | Can fall | Can’t fall |
| Can stop charging | Can start charging | Can’t stop or start charging | Can’t stop or start charging |
| Can collide into platforms | Can collide into platforms | Can’t collide into platforms | Can’t collide into platforms |
| Can move forward | Can move forward | Can’t move forward | Can’t move forward |
Unified state machine functions
The state machine manager doesn’t know the details that individual states do. However, there are unified functions that it can pass and require all other states to implement. This makes it more manageable to transition to other states. Three common functions used in my state machines are:
OnEnter:Called during state initialization. Useful for variable setup, event binding, and triggering animations.OnUpdate:Called every frame and typically serves as the main function responsible for transitioning to other states.OnExit:Called when the state is finished and transitioning to a new one. Often used for unbinding event listeners and performing cleanup tasks.
Additional functions may be required based on the object being controlled. For example, my game state machine does not need an OnUpdate function, but my ram state machine includes functions related to player control input and collision.
Creating the state machine
Example 1: Ram character
In this example, I will provide useful patterns for building your own state machine, but I won’t provide a step-by-step process, so the rest of the article assumes some familiarity with blueprints. The focus is on a state machine for my player-controlled ram character that is heavily influenced by player inputs and their consequences.
The setup involves an Actor blueprint for the ram character and a base Object blueprint for the ram state, containing the necessary functions. I then create multiple states of this object blueprint through inheritance, such as RamState_BP / RamStateMovement_BP / RamStateMRunning_BP.
Tip:
You can easily inherit a class by right clicking on a blueprint and selecting create child blueprint class.
The State Object blueprint
I recommend starting with the creation of the Object blueprint and defining functions that will be used in all other states. Additionally, determine the parameters required by these functions. You don’t need to identify all functions and their parameters initially, just the key ones to begin with.
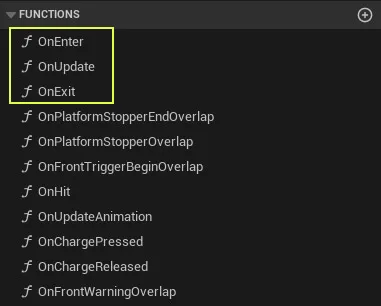
RamState object, with the common ones highlighted, the others are more specialized for the ram’s features.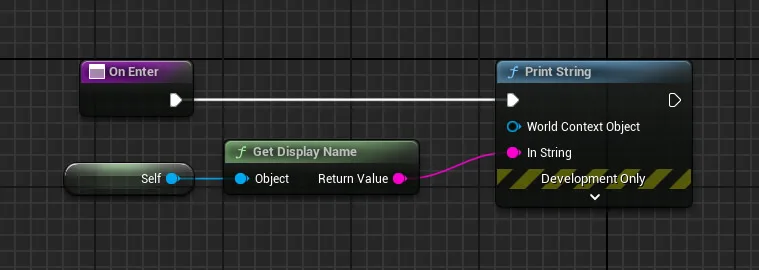
OnEnter function, which helps identify the current state during gameplay by printing the name of the active blueprint.Now that you have your base game state sorted, you can create child classes of that state. These classes will be the actual blueprints that will be used in the machine.
The Actor blueprint
The ram actor stores a variable called RamState, which is an object reference of the base state RamState_BP. The actor doesn’t know its current state but uses this variable to call the ram state functions implemented in each state.
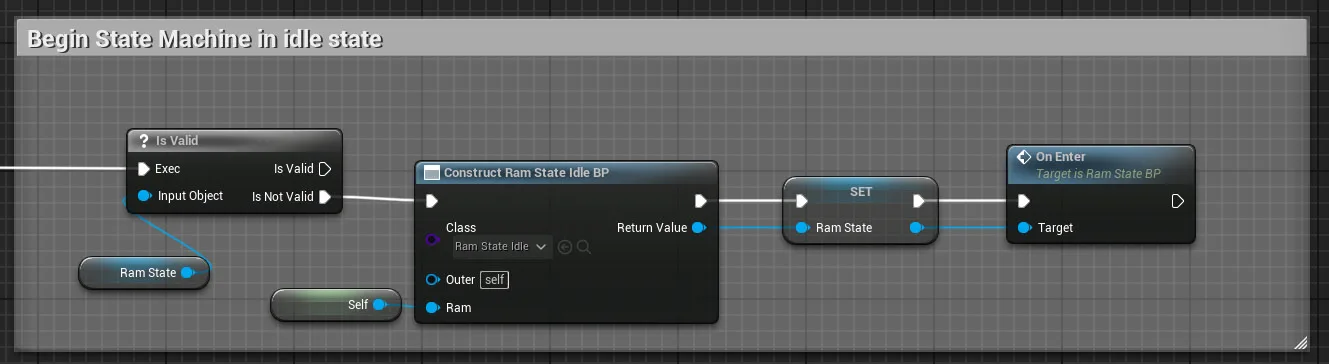
To start the state machine, I have code in the Begin Play event. It checks if a state is already running, and if not, it constructs the idle state, stores it in the RamState variable, and calls the OnEnter code of the state.
Tip:
A new object is made from a specified class every time you use the Construct Object from Class node. Unreal’s garbage pick up will destroy it automatically when the object is no longer referenced anywhere. Knowing this, I prefer to keep the state variable private to limit the number of references.
Connecting them together
Let’s look at my OnHit event:
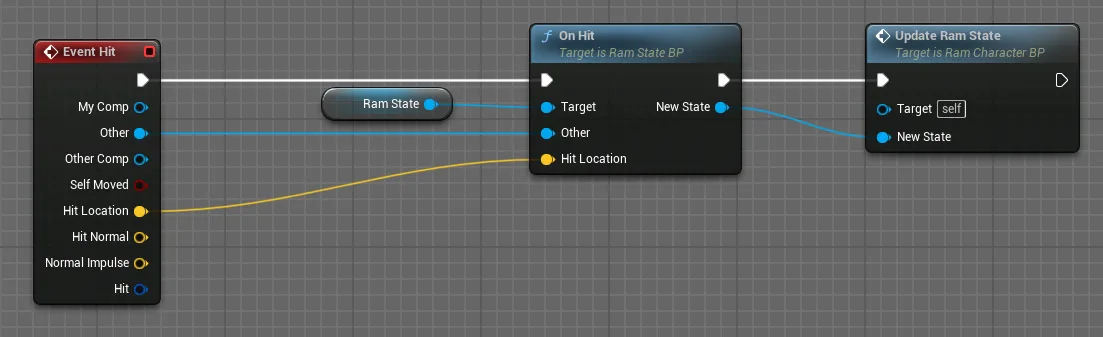
hit event in my ram actor.When handling events like this OnHit example, I pass the necessary information to my custom state’s OnHit function and then it returns a potential new state. The UpdateRamState function checks if the new state is valid and sets the state variable accordingly. It’s important to check for validity because the event can return a null state.

OnHit event in the charging state.The parent function doesn’t always have to be called as seen in the charge state’s OnHit code. I don’t call the parent function since I know it hit a breakable actor, making the parent code for death checks unnecessary.
Tip:
If a function ends without a return node, the return node is still called, but any returned variables are either null or set to their defaults.
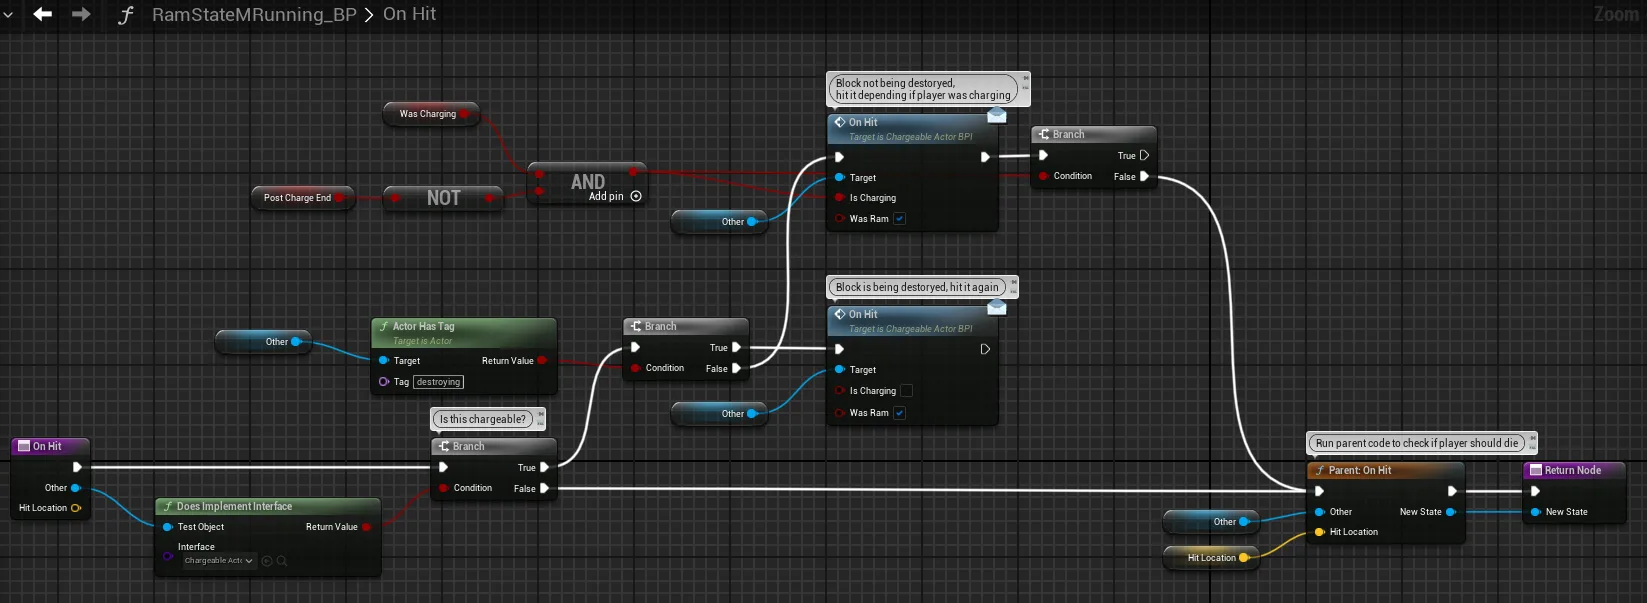
OnHit event in the running state.On the other hand, the logic is different in the running state’s OnHit code. It checks if the block was previously hit and then hit again while not charging. In such cases, I don’t want the block to kill the player but instead be sent flying again. However, if the block hasn’t been charged at yet and is still attached to a platform, there is potential for it to kill the player, so the parent function needs to be called there.
This is where state machines really shine, because having these situational conditions would be really painful to accomplish on one giant chain of code!
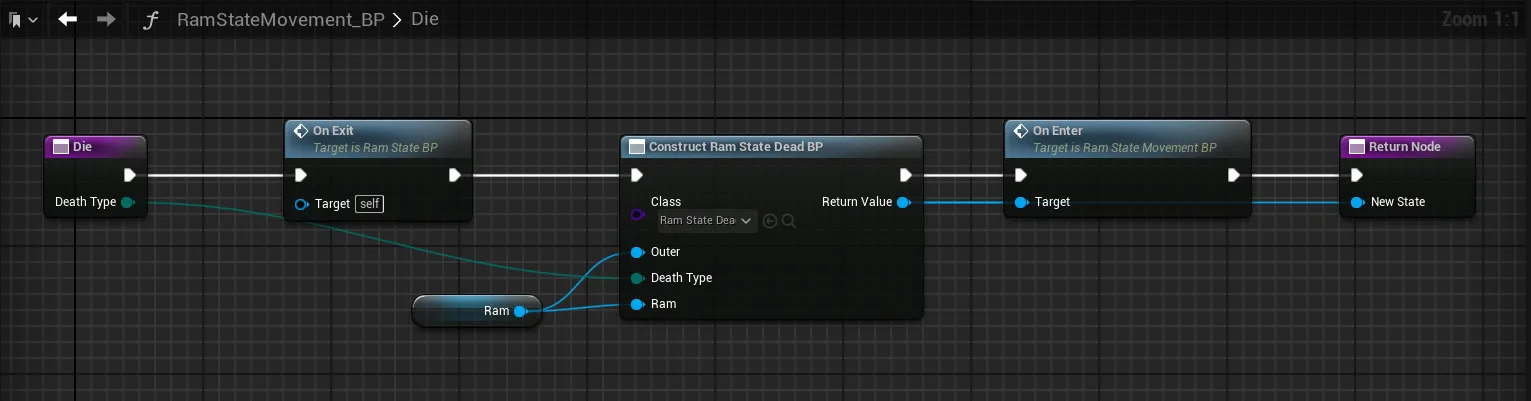
Here is the Die function in RamStateMovement_BP, the parent of the two states mentioned above. This function is called when the player hits a platform head-on after the previous checks have failed. It shares similarities with the state startup code on the main actor, with the main difference being the construction parameters specific to the death state.
Tip:
Enable Expose on Spawn to utilize construction parameters. More info on this is provided below.
Example 2: The Game’s states
This example showcases a state machine used to control transitions between different game states. Not to be confused with the Unreal GameState class, these game states handle transitions such as the main menu to gameplay.
There are a few slight differences between the ram state machine and this one as I tailored each to suit its purpose more effectively. The primary difference here is that there are only OnEnter and OnExit functions. Each state then creates its own custom functions and events specific to that state, while the OnEnter and OnExit functions are responsible for setting up those functions.
Game State blueprint
Here are the functions in the gameplay game state to get an idea of how it works:
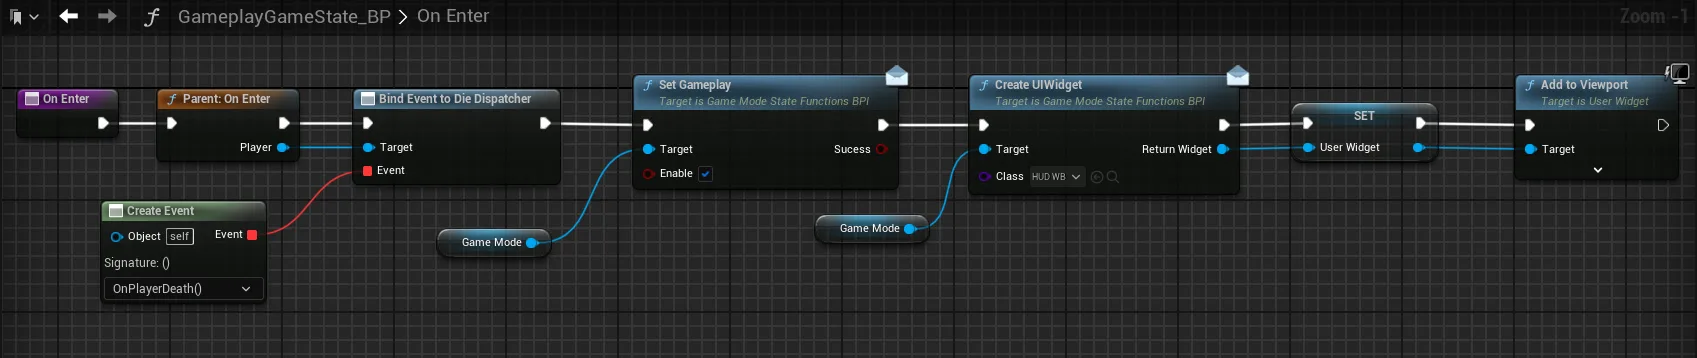
The main focus with my OnEnter function in the gameplay state is to enable gameplay in the GameMode, create the necessary UI, and bind event listeners.
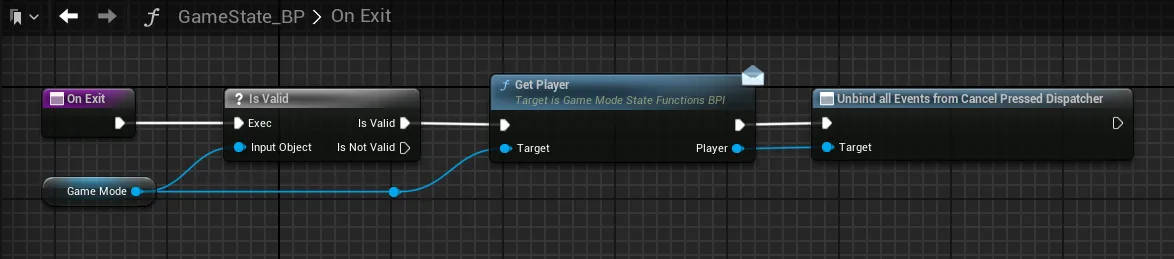
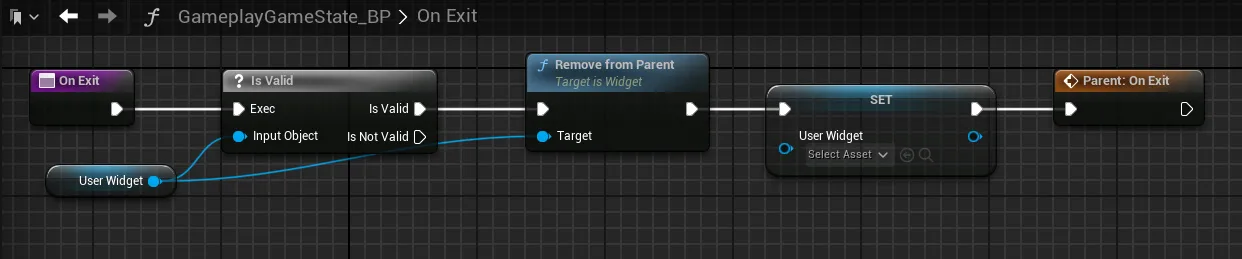
Similarly, the OnExit function focuses on clearing references and unbinding event listeners. This is important to ensure proper garbage collection.
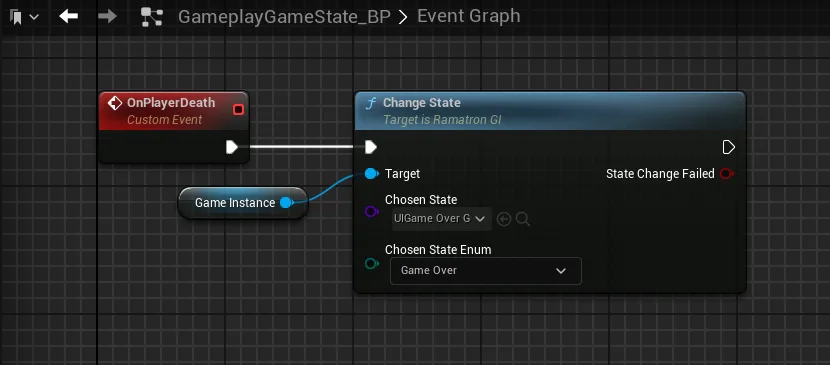
In the gameplay state, it simply waits for the player to die to transition to the next state. This transition utilizes a function I created in the game instance, which handles all aspects related to state switching.
As seen, there is no reliance on the state manager to call the state functions unlike in my ram state machine. This was a conscious choice because each game state is much more unique in it’s functionality than each ram state.
Game Instance blueprint
The only state related code in my game instance is the ChangeState function and the Init event that calls this function to begin the state machine.

ChangeState function.The ChangeState function in the game instance is similar to what was done in the ram state. It calls OnExit, creates the new state, and then calls its OnEnter function. I added additional elements such as an enum and a state change event call, which I haven’t used yet but thought might come in handy in the future.
Things to keep in mind
These tips may answer some questions you may run into when building a state machine:
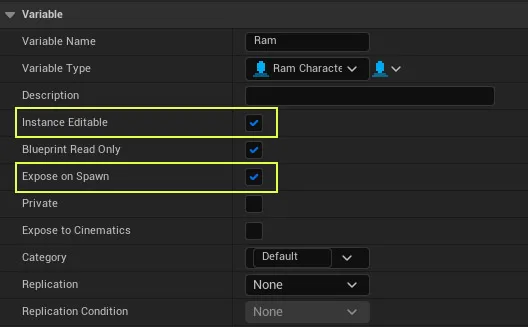
Expose on spawn
The state object blueprints are temporary objects, so variables will be erased when creating a new object state. To pass variable values to the next object state, toggle instance editable and expose on spawn in the variable settings. This will create a new input for the construct object from class node.
Working with no delays or timelines
State objects cannot contain delays or timelines, as those features are specific to the actor class. As a workaround, delegate necessary timelines to the actor managing the states and use CreateEvent with timed activation instead of delays.
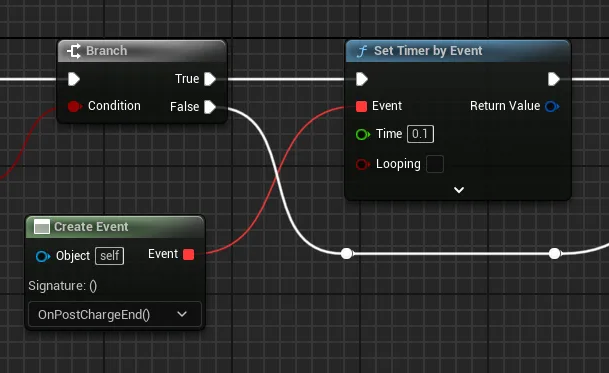
SetTimerByEvent node really comes in handy when coding with objects that can’t use delays.
OnFrontWarningOverlap decides if the actor dependent functions should triggerReturn nodes
Any functions that could potentially change to a new state should have a return parameter containing the desired new state. This allows the object using the states to update the state reference accordingly.

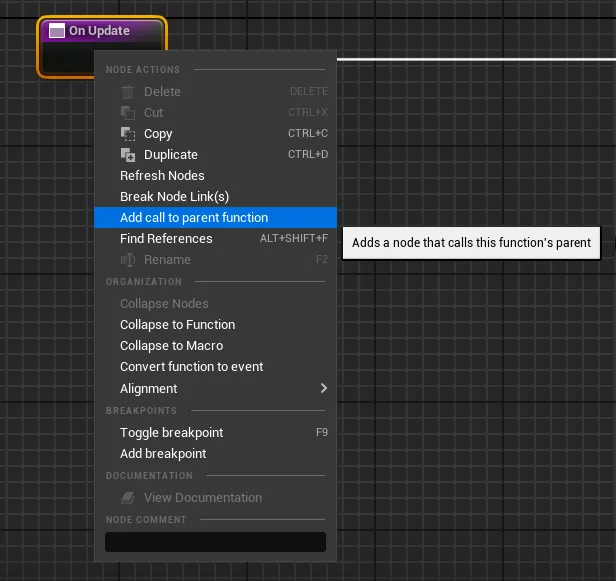
Calling the parent class
Remember to include callbacks to the parent function if it has code. Consider the appropriate timing for the callback—sometimes it is suitable to do it immediately, while other times it may be more appropriate to place it at the end.
Thanks for reading
I hope this article has been helpful and provided inspiration for building your own state machine, along with different approaches to managing it. If you’re interested in a step-by-step guide on state machines with blueprint, I recommend watching this well-done video that introduced me to this kind of pattern that utilizes blueprints.